Quick start: your first campaign in 10 minutes
Connect the AI, a sending account and a reply inbox, upload a lead list and start a campaign, in the order the app's setup checklist uses.
On this page
Who this is for: new users with a fresh account who want emails going out today. You need the login for the email account you will send from, and a spreadsheet (CSV) of leads.
The Dashboard shows a Get set up checklist with five steps. This guide follows the same order. The step marked Do this next is always the one to do now, and its button takes you to the right page.
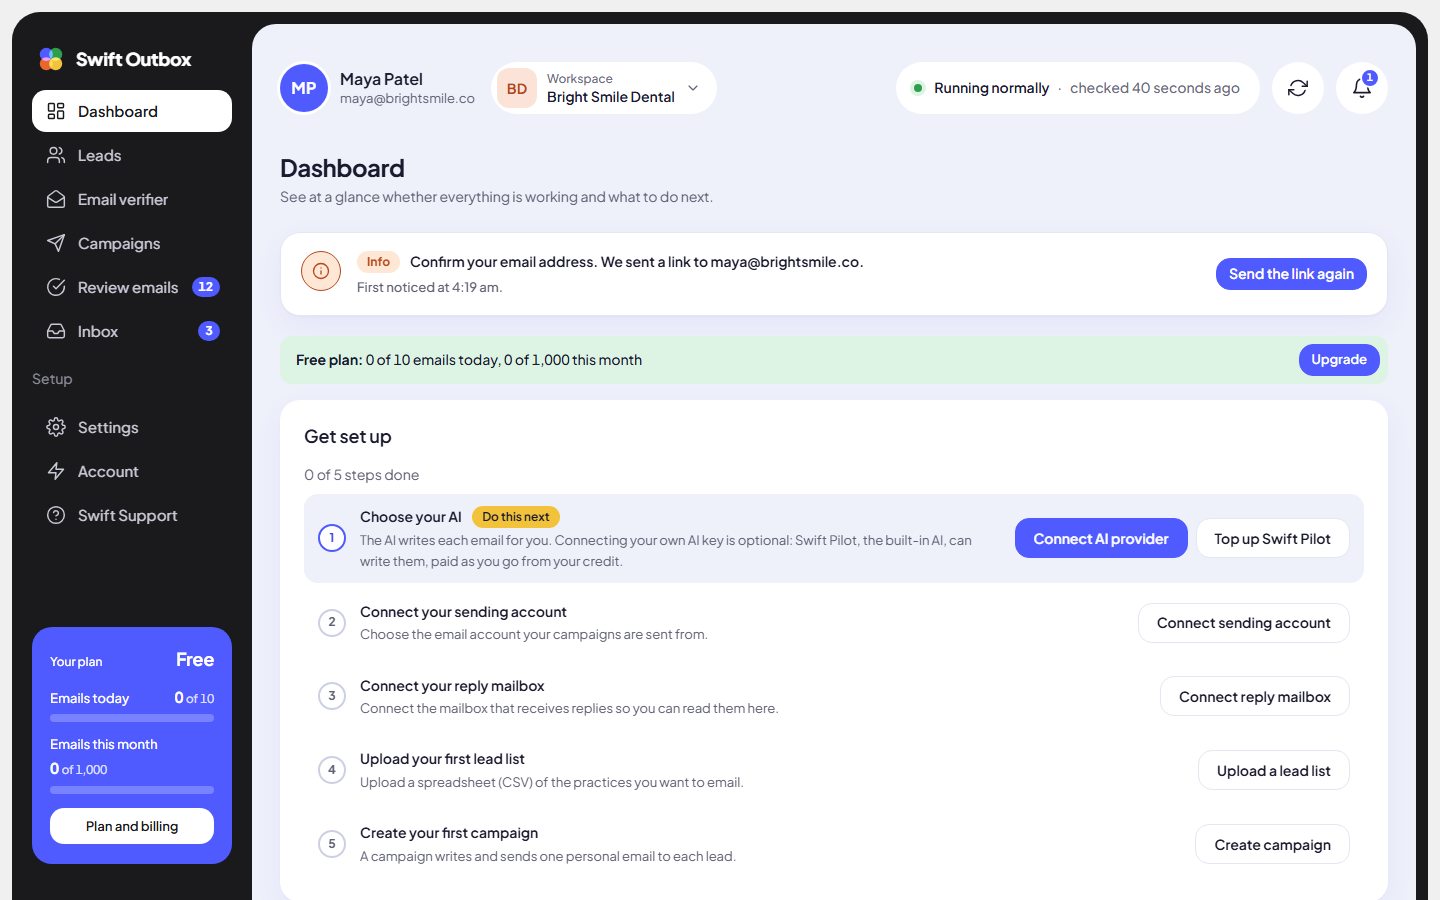
1. Choose your AI (1 minute)
The AI researches each lead and writes their email. Connecting your own AI key is optional: Swift Pilot, the built-in AI, can write for you and is paid as you go from your credit.
The first step of the checklist has two buttons:
- Use Swift Pilot (shown when you have credit, for example the monthly credit on a paid plan): click it and the step is done. Swift Pilot writes your emails from now on.
- Top up Swift Pilot (shown on the Free plan without credit): opens the top-up window. As soon as the payment goes through, the step is done.
- Connect AI provider: use your own OpenAI, Claude, Gemini, OpenRouter or compatible key instead. See Connect your own AI key. Your own key is tried first, and Swift Pilot takes over if it fails or reaches its budget while you have credit.
Tip: Paid plans include monthly Swift Pilot credit (Starter $5, Growth $10, Agency $30), so you can start right away. See Plans, credits and upgrades.
2. Connect your sending account (3 minutes)
- Click Connect sending account, or go to Settings > Sending accounts and click Add sending account.
- Pick your Email provider: Gmail, Outlook / Microsoft 365, Zoho, or Custom.
- Fill in Account name, Sender name and Sender email.
- Enter Email address or username and Password or app password. Gmail needs an app password, not your normal password.
- Leave Daily sending limit at 50 or lower for a new account, and click Add account.
- Click Send test on the new account and check the test email arrives. Campaigns can only use an account after a successful test.
The full walkthrough, including app passwords, is in Connect a sending account.
3. Connect your reply mailbox (2 minutes)
- Go to Settings > Reply inboxes and click Add reply inbox.
- Pick the same provider, enter the same email address and app password.
- Under Sending accounts whose replies land here, tick the account from step 2.
- Click Save and test mailbox. You should see “Saved and connected.”
Details: Reply inboxes.
4. Upload your first lead list (2 minutes)
- Click Upload a lead list on the Dashboard, or go to Leads and add a list.
- Upload your file: choose your CSV under Your spreadsheet and give it a List name (or leave it empty to use the file name).
- On paid plans, tick Verify these emails after import so bad addresses are caught before you send.
- Match your columns: check that the email, name, company and website columns are matched correctly.
- Import: wait for the progress bar to finish.
Note: The website column matters. Website research reads each lead’s site so the AI can mention something specific.
5. Create your first campaign (3 minutes)
- Click Create campaign on the Dashboard, or go to Campaigns and create a new one.
- Choose leads: give it a Campaign name and pick your Lead list.
- Subject: describe the subject line in plain words, for example “Short, friendly, mention their practice name.”
- Message: describe the email you want. The AI writes a personal version for each lead.
- Sending rules: keep Daily sending limit at 20 to 30, the days Monday to Friday, and Send between 09:00 and 17:00. Keep Before sending on I approve each email first for your first campaign.
- Review: check the summary and click Start campaign.
6. Approve your first emails
- Open Review emails in the sidebar. The badge shows how many drafts are waiting.
- Read each draft. Edit it if needed, then click Approve, or Skip to leave that lead out.
- Approved emails go out inside your sending window, a few minutes apart.
Tip: Read at least the first ten drafts closely. If they all miss the same thing, change the Message instructions in the campaign instead of editing every email.
Common mistakes
- Using your normal Gmail password. Gmail refuses it. Create an app password first; the sending guide shows how.
- Setting a high daily limit on a new mailbox. A new account sending 200 emails on day one is a spam signal. Start at 20 to 30 a day and raise it slowly.
- Forgetting to approve. With I approve each email first on, nothing sends until you approve drafts in Review emails.
Next step
Learn what each part of the Dashboard tells you: Dashboard tour.
Still stuck? Open a ticket from Swift Support in the app, or contact us.