Upload a lead list
Import a CSV, Excel, TSV, TXT or JSON file of leads, match its columns and get the leads ready for a campaign.
On this page
Who this is for: anyone adding their first list of people to email, or adding another one.
A lead list is one uploaded spreadsheet. Each row becomes one lead. A campaign always emails exactly one list, so uploading a list comes before creating a campaign.
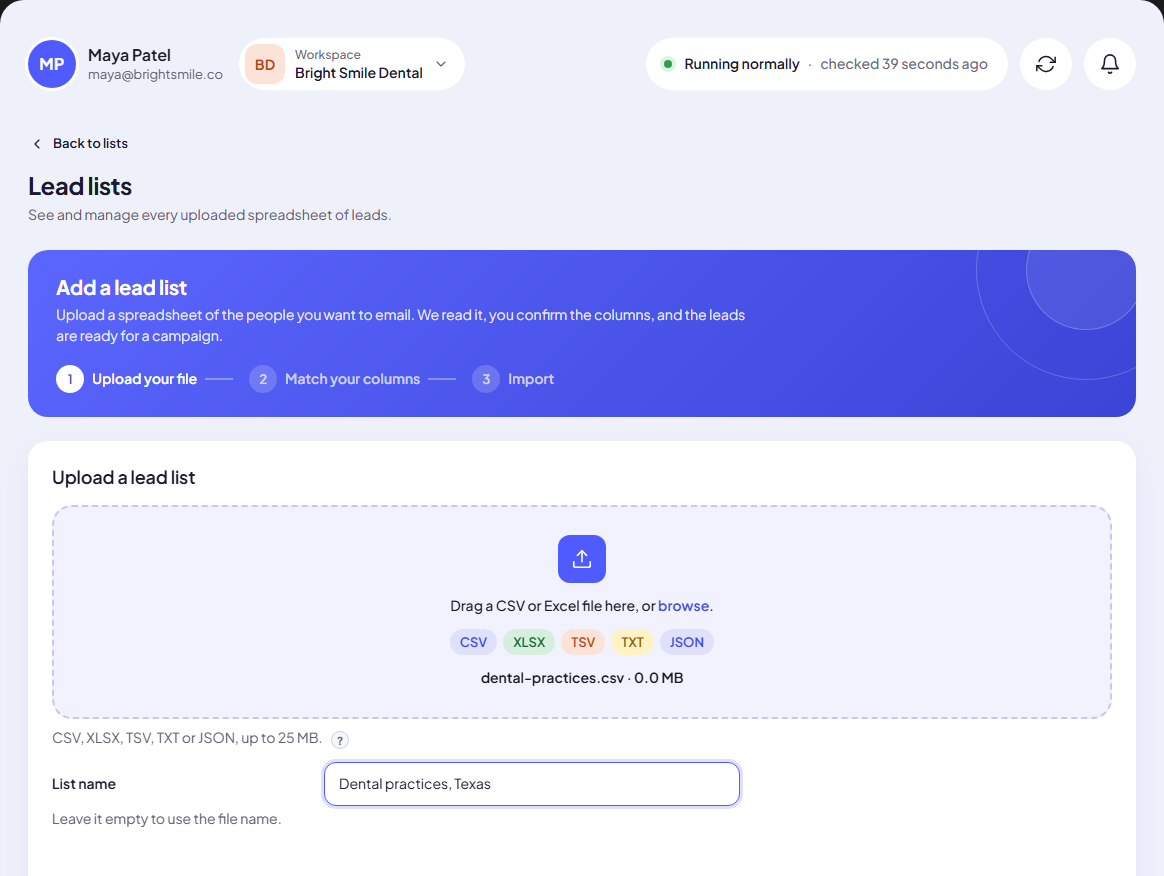
The import has three steps, shown at the top of the screen: Upload your file, Match your columns, Import.
Before you start
- Your file is CSV, XLSX, TSV, TXT or JSON, and 25 MB or smaller.
- The first row holds the column names (for example
Email,Website,Name). - At least one column holds email addresses. A website column and a name column are optional, but they make the AI-written emails much more personal.
Tip: Not sure your file is ready? Read Prepare a great lead file first. Five minutes of cleanup saves bounces later.
Step 1: Upload your file
- Open Leads in the left menu.
- Click Upload a lead list (top right). With no lists yet, the same button sits in the middle of the page.
- Drag your file onto the box, or click browse and pick it. The file name and size appear under the file types.
- Optional: type a List name. Leave it empty to use the file name. You can rename the list later.
- Optional, on paid plans: tick Verify these emails after import. Every address is checked as soon as the import finishes, using 1 verification per lead. See Verify a lead list.
- Click Continue.
Note: On the Free plan the verify option is replaced by a short line saying the Email verifier is included on paid plans.
Which files work
| File | What we read |
|---|---|
| CSV / TXT | The separator (comma, semicolon, tab or pipe) is detected for you. |
| TSV | Tab-separated, read like a CSV. |
| XLSX (Excel) | Only the first sheet. Upload it as it is, no need to save as CSV. |
| JSON | A list of leads, like [{"email": "...", "name": "..."}]. Each object is one lead; the keys become columns. |
Encodings (special characters)
You do not choose an encoding. We detect it from the file: UTF-8, UTF-8 with BOM, UTF-16 (both byte orders) and Windows-1252 (older Excel exports on Windows). Names like Müller or José come through correctly in all of them. The encoding we used is shown under File details on the next step.
Step 2: Match your columns
After the upload you see Check your columns and a line like We found 240 rows.
We match three details from your column names. Each row shows the column we picked, how it was matched, and an example value from your file so you can check it at a glance.
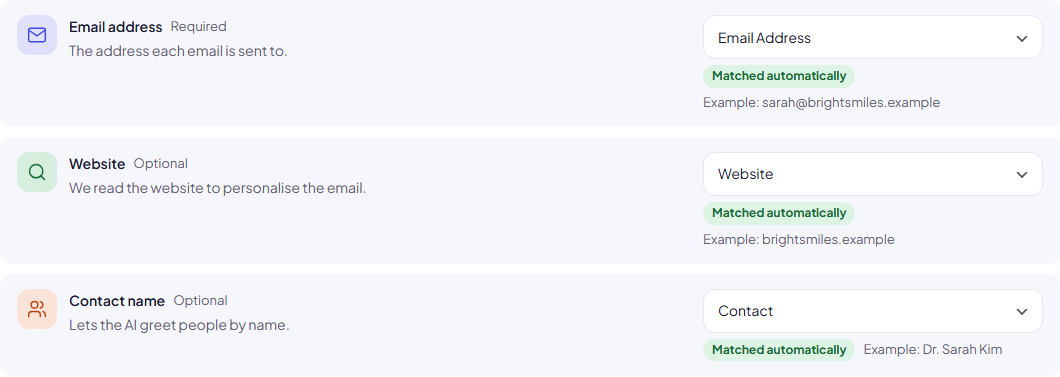
| Detail | Required? | What it is used for |
|---|---|---|
| Email address | Required | The address each email is sent to. |
| Website | Optional | We read the website to personalise the email. |
| Contact name | Optional | Lets the AI greet people by name. |
Each row carries a small label:
- Matched automatically: we found it from the column name. Check the example.
- You chose this: you picked the column yourself.
- Check this: the example does not look like an email address. Choose the right column.
- Not found: no email column was found. Choose it before you import.
- Not used: an optional detail with no column. That is fine.
To change a match, open the dropdown next to the detail and pick another column. For Website and Contact name, pick Not in my file when your file has no such column.
How the automatic match works
We look for common column names first, then for names that contain a keyword:
- Email:
email,e-mail,email address,work email,contact email,mail, or any column with email in its name. - Website:
website,company website,url,domain,web,site,homepage,company url,website url, or any column containing website, domain or url. - Contact name:
name,full name,contact name,contact,person. When there is no name column, we join first name + last name (alsofirstname/lastnameandgiven name/surname) for each row.
Open File details to see the file name, number of rows and columns, the separator and the encoding. Below it, the first five rows of your file are shown as a table.
Step 3: Import
- Click Start import.
- A progress bar shows Importing… 120 of 240 rows. You can leave this page; the import keeps going.
- When it is done you see Done. N leads are ready to email. and a View the list button.

If you ticked Verify these emails after import, a line under it links to the Email verifier, where you can watch the progress.
Changed your mind before importing? Click Cancel import. The uploaded file is deleted and you are back at step 1.
What happens to each row
- Email: spaces are trimmed and the address is lower-cased. If the email cell is empty or not a valid address, we look through the other cells of that row for a valid address and use the first one we find.
- Website: normalised to
https://domain.comform (thewww.is dropped). Free mailbox domains such as gmail.com or outlook.com are never used as a website. - Rows that are completely empty are skipped.
- Every column you imported is kept, so the AI sees the whole row, not only the three matched details.
- Addresses on your do-not-email list are imported but marked Skipped, so no campaign emails them.
Common mistakes
- The wrong column picked for Email. If the label says Check this, the example is not an address. Pick the right column before you click Start import.
- Mapping a free mailbox as the website. A column of
gmail.comvalues is not a website; those values are ignored, so those leads get no website research. - Hitting your plan’s lead limit. If the import reaches the number of active leads your plan allows, it stops with Import stopped at your plan limit of N active leads. Upgrade to import the rest. The leads imported so far are kept.
- Excel file with several sheets. Only the first sheet is read. Move your leads to the first sheet, or save that sheet as CSV.
Next step
Your list is imported. Learn what you can do with it on The lead lists page, or go straight to Create a campaign.
Still stuck? Open a ticket from Swift Support in the app, or contact us.