Verify a lead list
Check every address of a list, from the Email verifier, from the list itself, or automatically right after an upload.
On this page
Who this is for: anyone on a paid plan about to email a list for the first time.
There are three ways to start a check. They all do the same thing and use 1 verification per lead.
Option A: verify while you upload (easiest)
- Go to Email verifier and click Upload a new list to verify, or go to Leads and click Upload a lead list.
- Tick Verify these emails after import (it is already ticked when you came from the verifier).
- Finish the upload as usual. See Upload a lead list.
When the import is done, the check starts by itself and the success message links to its progress.
Option B: from the Email verifier
- Open Email verifier. Under Your lists, every imported list shows a bar of its results and the counts per result.
- Click Verify on a list that was never checked, or Verify again on one that was.
- Choose what to check (see below) and click Verify N leads.
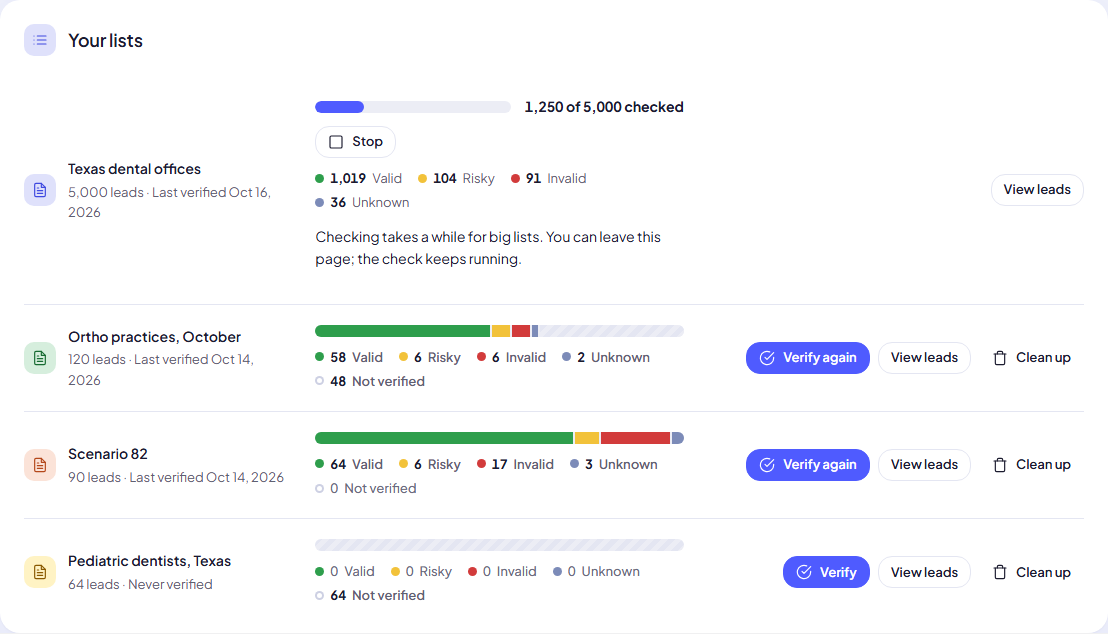
Click any count under a bar (for example 6 Invalid) to open that list filtered to those leads.
Option C: from inside a list
- Open the list from Leads.
- Click Verify emails at the top.
- Choose and confirm, as below.
Choose which leads to check
When a list has both checked and unchecked leads, the Verify emails window offers two choices:
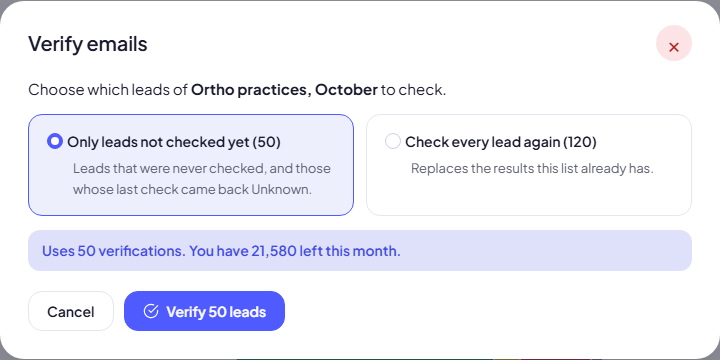
- Only leads not checked yet: leads that were never checked, and those whose last check came back Unknown. This is the usual choice and the cheapest.
- Check every lead again: replaces the results the list already has. Useful when the list is a few months old.
The window always says what it will use: Uses 50 verifications. You have 21,580 left this month.
Note: If the check needs more verifications than you have left this month, the window says so and offers a smaller run (Only check the N not checked yet) or Upgrade. See Your monthly verification allowance.
While it runs
- A progress bar shows 1,250 of 5,000 checked and the results so far.
- You can leave the page. The check keeps running on our servers.
- Click Stop to end it early. Leads already checked keep their result.
When it finishes
You see Finished. N addresses checked. with the Valid, Risky, Invalid and Unknown counts. Close the result with the ×.
If the month’s allowance runs out part-way, the run stops with a clear message, the leads already checked keep their result, and an Upgrade button is shown.
Common mistakes
- Verifying, then emailing every result anyway. Verification only helps if the campaign leaves out the bad results. By default, new campaigns leave out Invalid. See Choose which addresses a campaign emails.
- Checking every lead again by habit. Re-checking the whole list uses a verification for every lead. Pick Only leads not checked yet unless the list is old.
Next step
Remove the addresses that will bounce: Clean up a list.
Still stuck? Open a ticket from Swift Support in the app, or contact us.