Unsubscribe and the do-not-email list
How unsubscribe links work in every email, and how to block addresses or whole domains so they are never emailed by any campaign.
Who this is for: everyone. Respecting opt-outs is the law in most countries and one of the best things you can do for deliverability.
Every email has an unsubscribe option
You do not have to do anything for this to work:
- Every campaign email carries a one-click unsubscribe header. Gmail, Outlook and other apps show it as an Unsubscribe button next to your name.
- If your signature does not contain an unsubscribe link, a small Unsubscribe link is added to the bottom of the email automatically.
When someone unsubscribes, they see a page asking “Stop all emails from this sender?” and click Unsubscribe me. Their address goes onto your do-not-email list straight away, and no campaign emails them again.
Place the link yourself
To control where the link appears, add it to your signature:
- Go to Settings > Tracking and signature.
- In Signature, put the cursor where you want the link and click Insert unsubscribe link in the toolbar.
- Save. The automatic footer link is no longer added, because your signature already has one.
Tip: A plain line such as “Not interested? Unsubscribe” reads better than legal text and gets fewer spam complaints. People who cannot find a way out click Report spam instead.
The do-not-email list
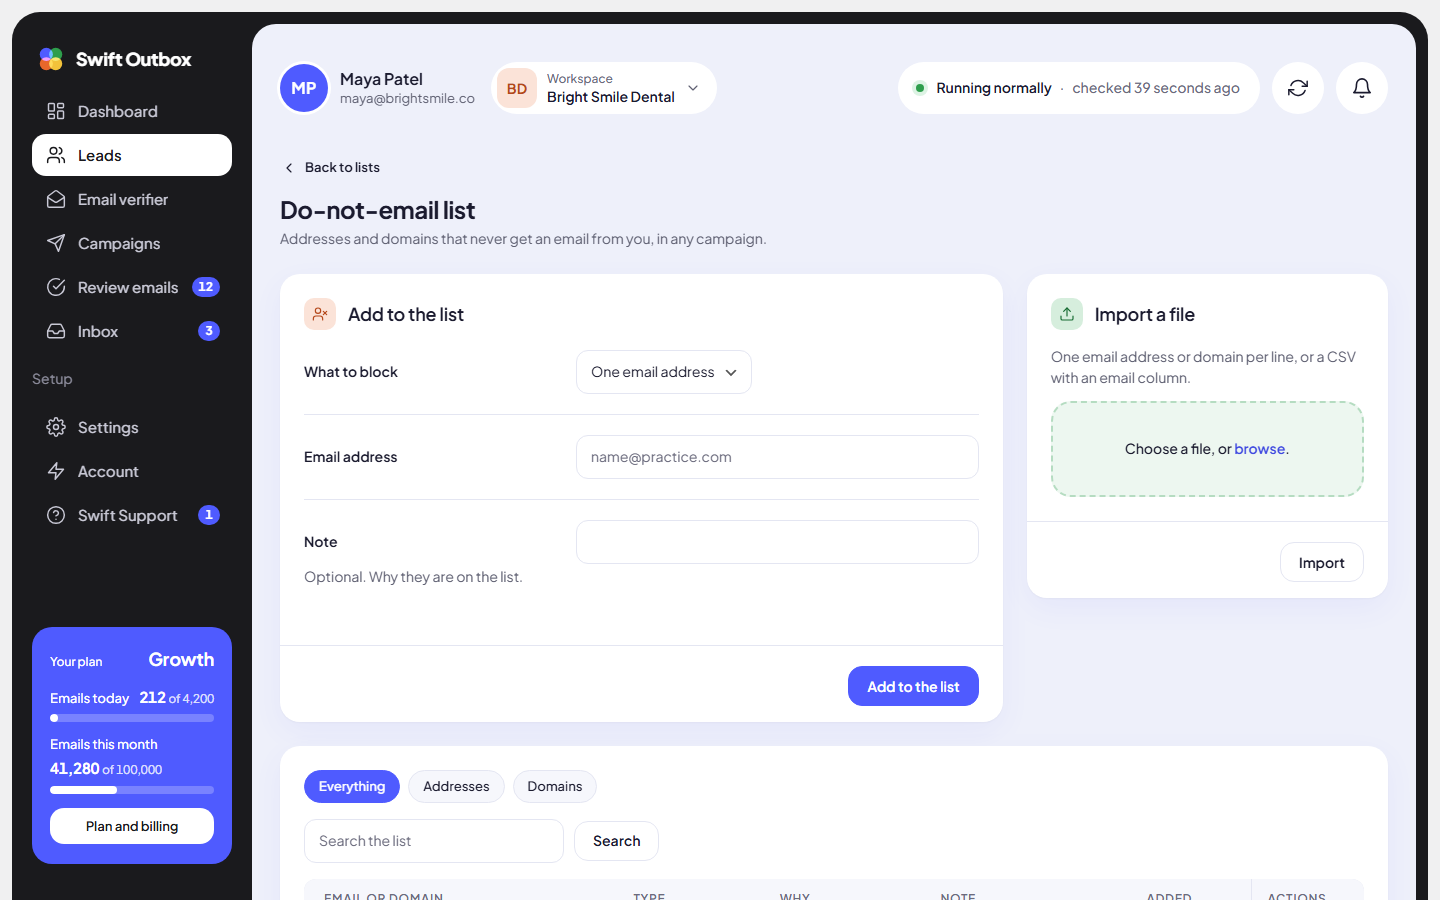
The Do-not-email list holds addresses and whole domains that never get an email from you, in any campaign. Open it from the Do-not-email list button on the Leads page. Each workspace has its own list.
Addresses are added automatically when someone:
- Unsubscribed from an email,
- Bounced (the address does not exist), or
- Marked as spam, found while checking your reply inboxes.
You can also add entries yourself (Added by you) or from a file (Imported).
Block one address or a whole domain
- In Add to the list, choose What to block: One email address or A whole domain.
- Type the address, or the domain such as
competitor.com. Everyone at a blocked domain is skipped. - Optionally add a Note about why.
- Click Add to the list. You will see that it “will never be emailed”.
Import a list
- In Import a file, choose a
.txtfile with one email address or domain per line, or a.csvwith an email column. - Click Import. The result tells you how many were added and how many lines were skipped (already listed or not valid).
Tip: Import your current customers and your own team’s domain before your first campaign, so nobody you already work with gets a cold email.
Find and remove entries
Use Search the list and the Show filter (Everything, Addresses, Domains) to find an entry. To remove one, use its remove action and confirm with Remove. Campaigns may then email that address or domain again, so only remove an entry when the person has asked to hear from you.
Common mistakes
- Removing an unsubscribe to “try one more time”. Do not. It breaks anti-spam laws and the person will likely report you.
- Blocking a shared domain by mistake. Blocking
gmail.comskips every Gmail lead. Block single addresses on public email domains. - Deleting the unsubscribe link from your signature. The app adds one anyway, but a missing visible link gets you more spam reports.
Next step
Learn what your plan includes and how upgrades work: Plans, credits and upgrades.
Still stuck? Open a ticket from Swift Support in the app, or contact us.