Scale with multiple sending accounts and workspaces
Spread sending across several mailboxes, run campaigns side by side and keep brands or clients apart with workspaces.
On this page
Who this is for: users who have outgrown one mailbox, and agencies running outreach for several clients.
How the app spreads sending across accounts
With more than one sending account, each email is sent from one of them, picked automatically:
- Only accounts that are enabled and Working or Needs attention are used.
- Each account stays within its own Daily sending limit, Hourly limit and Wait between emails (seconds).
- Among the accounts with room left, the one with the most daily room goes first; ties go to the one used longest ago.
- A lead stays with the account it was first sent from. If that account is full, the email waits; if it is switched off or broken, another account takes over.
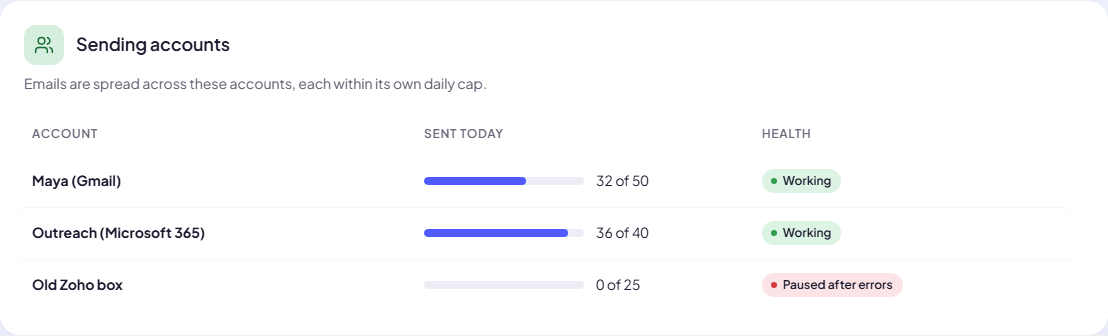
The campaign’s Sending accounts card shows each account’s sends today against its cap and its health.
Step by step: add capacity safely
- Settings > Sending accounts > add the new mailbox, then click Send test.
- Set its Daily sending limit low (20 for a brand-new mailbox, see the Deliverability playbook).
- Set Reply inbox for the account, so replies to it are read.
- In your campaign, either keep Send from > All enabled accounts (new accounts join automatically) or switch to Choose accounts and tick it. Send from can only be changed while the campaign is a draft.
- Raise the campaign’s Daily sending limit to match the combined caps.
- Watch the account’s health on the campaign page for the first week.
Tip: Capacity per day is roughly the sum of the account caps, then capped by the campaign’s daily limit, the optional Total daily limit (all accounts) in Settings > Tracking and signature, and your plan’s daily and monthly email limits.
Running several campaigns at once
- Every running campaign gets a fair turn at sending, oldest last send first.
- Each lead list can be used by one open campaign at a time, so split big lists by segment (city, specialty) and run one campaign per segment.
- The number of campaigns you can run at once depends on your plan (active campaigns). Starting one more opens the upgrade dialog.
- Accounts are shared: two campaigns using All enabled accounts draw from the same daily caps.
Workspaces: one per brand or client
A workspace has its own leads, campaigns, sending accounts, reply inboxes, AI connections, settings and time zone. Your plan, its limits and your Swift Pilot credit belong to the whole account and are shared by all workspaces.
- Open Account > Workspaces and add one per brand or client.
- Switch with the Workspace menu in the top bar. Every page then shows that workspace only.
- Set the workspace time zone; campaigns use it unless they pick their own.
How many workspaces you can have depends on your plan. When you have used them all, you see You are using every workspace your plan includes. Move to a bigger plan to add more.
Agency setup that scales
| Need | Setup |
|---|---|
| Client data stays separate | One workspace per client. |
| Client domains protected | Each client’s sending accounts on that client’s cold-email domain. |
| Fast approvals | Review mode on, approve from Review emails (all campaigns of the workspace in one page). |
| Daily check | Dashboard per workspace: Needs attention, Waiting for your approval, Inbox. |
| Reporting | Campaign report Export CSV per campaign. |
Plan limits to keep in mind
Your plan sets the number of workspaces, sending accounts, reply inboxes, active campaigns, emails per month and (on Free) emails per day. When sending stops at a plan limit, the campaign activity log and the bell say so, for example Daily plan limit reached (80 of 80 emails today). Sending resumes tomorrow, or upgrade for a higher limit. See Plan and billing for your numbers.
Next step
When something goes wrong at scale: Troubleshooting A-Z.
Still stuck? Open a ticket from Swift Support in the app, or contact us.